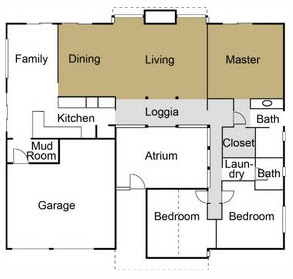
Our vacation from home improvement has come to an abrupt end. Last weekend we started our quest for indoor tropical plants for the atrium. After a few disappointing stops we found ourselves at the Portland Nursery on SE Division near I-205. They have three large rooms devoted to anything tropical… plants, furniture, tiki inspired garden accessories, etc. We walked through the greenhouse rooms several times and selected our favorites.
(Side note: Steve and I kill everything green we’ve ever owned. We even managed to do in a cactus! So our decision to fill the atrium with LIVE plants is quite an unsettling thought.)
Sensing our apprehension the lady at the information desk walked us through the showrooms and talked to us about each plant we liked and how to take care of them. She shared with us the amount of water, sunlight, and food each variety needs. Also interesting is that tropical plants are very happy to be confined to small pots. (Very good info since I think that’s how we killed the cactus… transplanting it into a huge pot to give it room to grow! OOPS!)
Our purchases:
1) 5′ Dracaena Marginata Staggered tree
1) 3 gal. Philo Monstera (split leaf Philodendron)
1) 6.5′ Foxtail Palm
3) Small Dracaenas
5) 40 lb. bags of red lava rock
1) 2′ low profile planter bowl (for the tiki fountain base)
3) 9″ plastic pots
2) 12″ buckets (uses as pot for larger plants)
1) 6 light low voltage landscape lighting set
1) 25′ 16 gage wire cord for lights
1) electrical transfer box (?)
1) mason bit saw blade
1) 22″ BBQ grill
We already have a 5′ palm that sits next to the front door in an orange bullet planter. Even though we purchased it for our daughter a year ago, given our history with houseplants we have not planted it yet, so it just sits in the planter with it’s purple store wrapper still around it’s base.
The new plants make a great addition to the atrium. We could feel the difference just bringing them in and setting them in the middle of the room.
Step 1: Clean out atrium and finalize bed design
The basic beds and step are built with concrete blocks. We roughed it in several months ago, but needed to cut the blocks on the ends to fit. The blocks were a little difficult to cut. Once scored with the saw, we found that the dry chisel worked best.
DD and I reset the blocks and put the plants in place.
Step 2: Lighting design
With the plants in place and the concrete beds complete we put the lights together. The kit included six lamps, but the final design only uses five:
1—corner up light behind the Dracaena tree
1—low spot in front of water freature
2—low spots on posts between low Dracaenas
1—corner up light behind Foxtail palm
We need to add 2 low filtered light on either side of the step.
Step 3: Install electrical transfer box and connect lights
The lighting is set up on a timer system that goes on at 5:30pm and off at midnight. (Tropical plants need to rest at night.) The box was attached to the wall next to the outlet for easy access.We fished the electric wire behind the step and coiled it around the pots and water feature. With the cord attached and in place we clamped each light into the cord… Whoa-La we have light!
Step 4: Hook up water feature
We built this tiki fountain a few months ago, but found the the bowl was too small. The new, bigger bowl worked great with the BBQ grill insert. Strong enough to hold the fountain, rocks, and water. Steve hooked up the pump and filled the bowl with water. The water bubbled up and spilled over the tiki face. With a few minor adjustment the fountain was ready for rock.
Step 5: Add red lava rock
Each bag of rock weighs 40 pounds. Not too bad unless you are leaning over a contrete bed, holding back delicate plant leaves, and trying to control the flow of rock so you don’t break the glass wall behind the plants! The red rock adds a good contrast to all the gray concrete.Note: 200 lbs. of lava rock is not enough! Bought an extra 280 lbs. (7 bags) and need to buy about 3 more bags to complete all the beds.
Awwww! This is the most peaceful room in the house. I especially like the glow at night when all the other lights in the house are out… it’s like a night light for the whole house.
Here’s the before and after pictures:


Wow- what a difference! It’s hard to look at the “before” picture..it’s so not your house! Thanks for the updates!
I know! It’s shocking to search through the pictures from our initial walk through. How easily we forget. (Let’s pause for a moment of silence in memory of the lattice!) -H